Links Mapping
SyncNow's links and relations mapping engine enables synchronization of entity relationships across different work systems. This powerful feature ensures that links and references between entities are accurately maintained and synchronized.
SyncNow also supports field entity references. For example, you can retrieve a contact name from a case entity in ServiceNow and synchronize it as a reference in another system.
📝 Step-by-Step Guide to Links Mapping
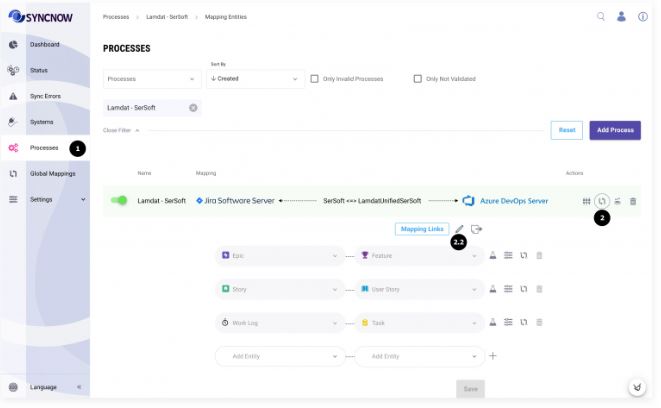
1️⃣ Navigate to the Processes Page
Go to the Processes page in the SyncNow application. This is where you will begin the links mapping process.
2️⃣ Initiate the Entity Mapping Process
Press the Mapping Entities button.
If your process inherits a global mapping, press the Edit Global Mapping button to customize the inherited settings.
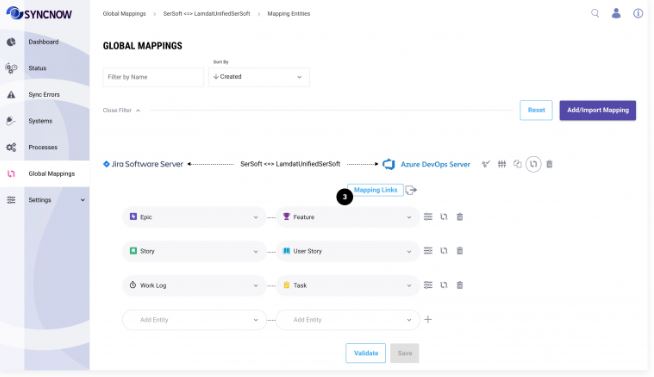
3️⃣ Open the Links Mapping Interface
Press the Mapping Links button to open the interface for configuring links and relationships between entities.
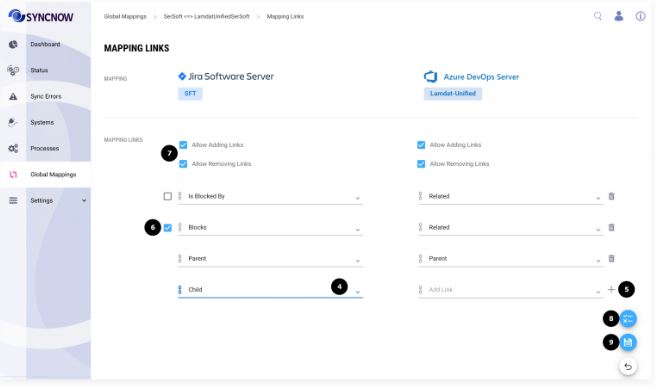
4️⃣ Select Link Type Pairs
Identify and select the link type pairs that need to be synchronized between the systems.
For example, you might map "Relates to" in System A to "Related" in System B, or "Parent" in System A to "Parent" in System B.
This ensures that corresponding links in different systems are correctly aligned for synchronization.
5️⃣ Add Additional Link Pairs
If you need to map more link pairs, press the Plus button to add additional pairs.
This allows you to extend the mapping to cover all necessary link types across the systems.
6️⃣ Configure Default Target Link
Select the default target link if a single link type (e.g., "Related") can be synchronized into different link types in the target system.
This setting ensures that links are mapped correctly in scenarios with multiple potential target links.
7️⃣ Configure Link Addition/Removal Permissions
Choose whether systems can add or remove links in the other system.
This setting controls the ability to modify links during synchronization, ensuring that link integrity is maintained according to your synchronization rules.
8️⃣ Validate the Mapping
Press the Validate button to ensure that the new mappings do not disrupt any existing processes that have inherited the global mapping.
This validation step checks for conflicts and potential issues, ensuring the integrity of the synchronization setup.
9️⃣ Save the Mapping
After validation, press the Save button to finalize and save your link mappings.
This commits the changes and makes the new mappings active for synchronization.
🔟 Confirmation of Mapping Creation
Once the links mapping is created, you will see a confirmation message, and the new mappings will be listed in your configuration.
You can now proceed to configure additional mapping options if needed.
Tip:
Regularly review and validate your link mappings to ensure relationships between entities remain consistent and accurate across all connected systems.